Andrea, a talented voice actor, was ready to take her home studio to the next level. After investing in a new Rode NT1-A microphone and a Focusrite Scarlett Solo interface, she was excited to start recording. However, she was quickly disappointed with the results. Despite hours spent watching YouTube tutorials and experimenting with plugins in Reaper, her audio sounded thin and lacked the professional quality she needed. Frustrated and unsure of her next step, she reached out for help.
The Amazing Audio Solution
Andrea booked a 90-minute Pro Audio Setup session, and we began a detailed, step-by-step diagnostic of her entire signal chain. We discovered that the solution was not more plugins or new gear, but a precise focus on the fundamentals.
Acoustics & Mic Placement: We began by making subtle adjustments to her microphone’s position in the room to minimize unwanted reflections and ensure a clean recording environment. We also fine-tuned her distance from the microphone to find the perfect spot for her voice.
Hardware Configuration: We verified all the settings on her Focusrite Scarlett Solo to ensure the gain was correctly set and the audio signal was clean, avoiding any distortion.
Software Optimization: Inside her DAW, Reaper, we confirmed that all settings were optimized for her new interface. After some listening tests, we found that Andrea’s recording environment and the quality of her gear meant that heavy-handed EQ was not needed at all. Instead, we applied only a slight amount of light compression and a gentle low-end roll-off to give her voice a professional presence without sacrificing its natural tone.
The Result
After the session, Andrea completed a few quick test recordings. The difference was immediate and dramatic. The sound was rich, full, and perfectly captured the quality of her new microphone.
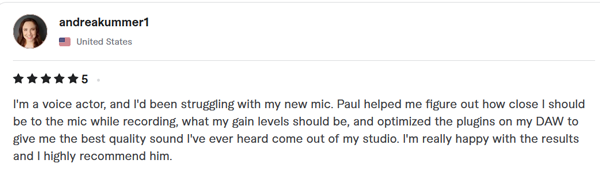
Her response was the best measure of success: This is the “best quality sound I’ve ever heard come out of my studio.”
Get Your Pro Audio Setup
Just like Andrea, you can get professional-quality sound from your home studio. Our Pro Audio Setup session will diagnose and optimize your entire signal chain, so you can stop troubleshooting and start creating.
Related Service
🎤👨🔧🎛️🎚️
Pro Audio Setup
We take care of everything for you.
Full remote setup and configuration of your single-mic studio.
Hi Paul. I am having a problem recording my Blue Yeti microphone in Audacity. I can’t work out how to turn the built-in noise cancellation off. Can you help me?
I recently received this request from a new client on Fiverr and we arranged a remote support appointment for later that week.
Problem
My client explained that she was trying to record guided meditations using a Blue Yeti microphone into Audacity on PC. For some reason, the audio settings were causing the ends of her words to be clipped off and the sound of her breath was not being recorded between her lines. She could only hear silence when she was not speaking.
At the start of our remote support appointment we made a quick test recording in Audacity so I could see the problem for myself, and the issues my client described were immediately obvious. There was a noise gate and possibly other effects applied, probably by Windows 11. I explained that Audacity doesn’t have built-in noise cancellation, but Windows 11 does.
Solution
Windows has audio enhancement features that can be applied to any of the sound inputs. These are useful if you want your voice to sound clean when using a laptop microphone during a Zoom conversation, for example.
In my client’s instance, the audio enhancements were unsuitable for recording a guided meditation.
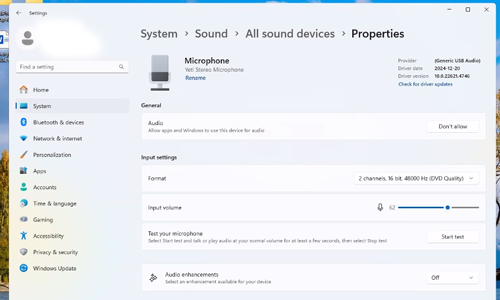
I guided my client to her PC’s sound settings and told her to disable the audio enhancements for her Blue Yeti.
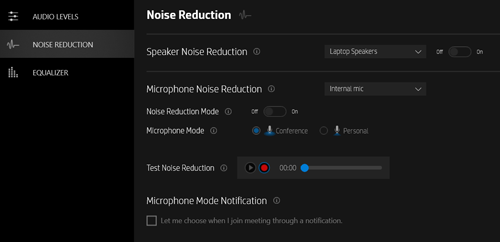
We also needed to open the HP Audio Center and disable Microphone Noise Reduction.
We made another test recording in Audacity, and my client was pleased to hear that her breath was being picked up and recorded between her lines of dialogue.
Additional Support
Since this problem didn’t take long to resolve and my client had paid for an hour of my time, I gave her some additional advice about her audio setup.
Gain
I checked through the gain staging of my client’s setup and made sure she had the best settings on her microphone and recording software to get the optimum signal-to-noise without distortion during her recordings. We made some test recordings to show her examples of good and bad settings.
Output Monitoring
I explained to my client how she could change the audio output options in Windows to avoid having to unplug her microphone when she wanted to hear back her recordings in Audacity.
Polar Patterns
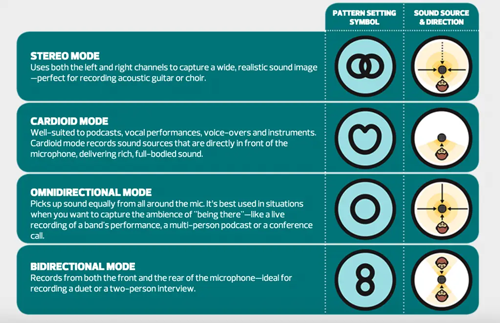
I explained to my client the correct polar pattern to select on her Blue Yeti microphone (Cardioid). It turned out she had the wrong one selected, so she was pleased to hear the improvement this made in her sound.
Mic Positioning
I explained to my client how the positioning of the microphone affects the recorded sound and gave her tips on how best to position the mic in relation to her mouth.
Conclusion
At the end of our hour’s session, my client was happy that she now make clean recordings of her guided meditations. We had eliminated the audio issues and she now had a much better understanding and confidence in using her audio setup.
After the session, my client was kind enough to leave me this nice review:
I had a session with Paul, and he helped me in more ways than I can express. I’d been struggling for months to get proper sound through my recording app due to an issue on my computer, and it was holding me back. Paul not only resolved the issue but went above and beyond. He walked me through every microphone setting, showed me how to use the recording app, and set everything up, so my sound quality is incredible. I feel like a huge weight has been lifted, and I’m so grateful for his expertise. If you need help with your podcast setup or sound quality, Paul is your person!
Related Service
🎤👨🔧🎛️🎚️
Pro Audio Setup
We take care of everything for you.
Full remote setup and configuration of your single-mic studio.
Hi Paul. I have a YouTube channel where I make reaction videos. My problem is that I can’t raise the volume of my voice. I can lower the volume of the original video but then the overall volume of my channel is really low. I am using a Blue Yeti microphone and Logitech G Hub. Can you help me sort this out? – WG
I received this enquiry via my Fiverr profile and arranged to connect with the client for a remote support session.
How I solved this problem:
Connected with my client via AnyDesk remote desktop and WhatsApp Voice Chat
Discussed the problem with my client and listened to existing videos so I could hear for myself.
Set up a private YouTube stream so I could monitor my client’s voice and make changes in real-time
Removed existing audio effects in OBS and Logitech G Hub
Made sure my client had his Blue Yeti microphone positioned correctly
Made sure my client had his Blue Yeti microphone set to Cardioid mode
My client was recording in a warm room and had a fan running. I set up a noise gate in Logitech G Hub to reduce the sound of the fan from the while he wasn’t speaking.
Set up a compressor in Logitech G Hub to boost the level of my client’s voice. I pulled up a voiceover preset and adjusted the compressor’s parameters to find the best threshold level and make-up gain settings to suit his voice.
Tweaked the settings and tested the balance of the volume levels of the videos my client was reacting to and his voiceover.
Used a noise suppression filter in OBS to further remove the sound of the fan.
Set up a limiter in Logitech G Hub to ensure the signal wasn’t clipping.
My client recorded some test videos to make sure everything working
At the end of the session, my client was happy with the way his voice now sounded and the balance of the audio levels in his YouTube videos.
After the session, my client was kind enough to leave me this nice review:
Couldn’t have asked for better help. Paul was great in every way. Clear and concise, while also explaining to me what he was helping with the whole time. The next time I have sound issues, I’ll be sure to reach out to him again. – ⭐⭐⭐⭐⭐
Related Service
🎤👨🔧
Live Diagnostic Call
Remote screen-share session to diagnose and resolve audio problems
We listen, explain what’s wrong and show you how to fix it.
Hi Paul. I’m having issues configuring OBS and Xbox audio. I would like to stream on Twitch while communicating with chat and playing Xbox while listening to music. I have in-game chat/music/OBS alerts and picture from the capture card all working. I just can’t get the capture card and headset/mic to cooperate at the same time. Can you help me please? – J
The hardware I’m using is:
Hp Elite Mini 600 Desktop PC
Elgato HD60X capture card
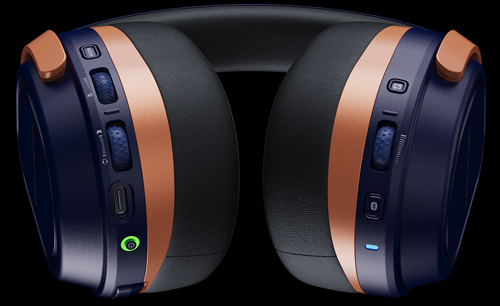
Turtle Stealth 700 Gen 3 cross platform headset
Xbox one
I received the above message from a new client via my Fiverr profile and we arranged a remote support session for later that week.
Once my client and I were connected we had to work through a number of problems to get everything working properly. These were the issues I helped my client resolve:
Turtle Stealth 700 Headset connecting via both Bluetooth and USB receiver
This model of headset has multiple ways it can connect to a user’s PC/Xbox. Inside the product’s packaging are a pair of USB receivers. One is to be connected to the user’s Xbox and one to the user’s PC. The user can then send audio to either receiver using the CrossPlay button on the side of the headset. This system allows the user to quickly switch between listening to their Xbox or PC audio.
The headset can also communicate to the PC/Xbox via traditional Bluetooth connectivity. This method does not allow one-button switching between devices.
When my client and I investigated his Windows Audio Settings, we found the headset was connected by both USB receiver and traditional Bluetooth. We disabled the traditional Bluetooth connection and changed settings so Windows would only connect via the USB receiver in the future.
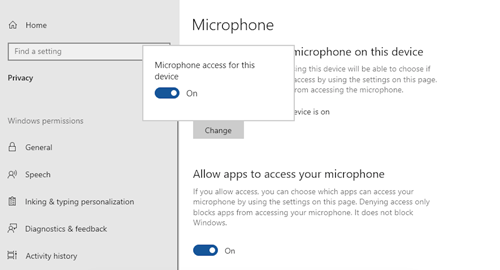
No signal from Turtle Stealth 700 microphone in OBS
This turned out to be a Privacy and Security setting in Windows. My client wasn’t aware that he had set Windows to block access from all applications to use the microphone. I showed my client how to make the changes to allow OBS to use the microphone.
From the Windows support page:
To use your microphone with apps on Windows, you’ll need to turn on some permissions in Privacy & security settings. Here’s how:
Select Start > Settings > Privacy & security. Then look for Microphone under App permissions and make sure Microphone access is turned on.
Then, allow apps access to your microphone. In Microphone settings, go to Let apps access your microphone and make sure it’s turned On.
Once you’ve allowed microphone access to your apps, you can change the settings for each app. In Microphone settings, go to Choose which apps can access your microphone, and turn on apps you want to use with it. For desktop apps, make sure that Let desktop apps access your microphone is turned on.
Routing in-game Party Chat to OBS
My client and I had solved the first audio problem. He could now record and monitor audio from his headset into OBS.
We then moved onto another problem. My client wanted to be able to hear and speak to his in-game friends in Party Chat and have that audio streamed to Twitch via OBS.
The solution to this was in the Xbox’s settings.
We needed to set Party chat output to Headset and Speakers.
Additional Support
My client and I ran a couple of test streams to make sure everything now worked as expected. We had a video issue related to Twitch’s Enhanced Broadcasting with Multiple Encodes feature not being compatible with my client’s GPU. I showed my client that we could disable enhanced broadcasting option in OBS to resolve the problem.
Conclusion
At the end of our remote session my client was pleased with what we had achieved:
His headset could now send audio to either OBS or Xbox and he could switch between them using the CrossPlay button on the side of the headset
His in-game audio was now correctly streaming to Twitch via OBS
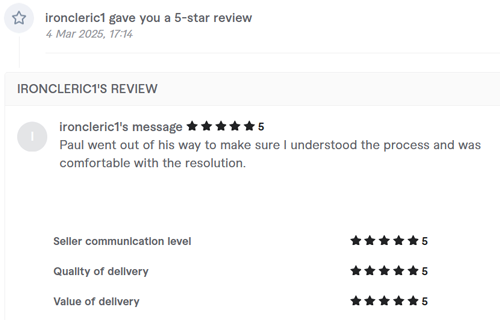
After the session my client was kind enough to leave me this nice review on Fiverr:
⭐⭐⭐⭐⭐- Paul went out of his way to make sure I understood the process and was comfortable with the resolution.
Related Service
🎤👨🔧
Live Diagnostic Call
Remote screen-share session to diagnose and resolve audio problems
We listen, explain what’s wrong and show you how to fix it.
Remote Connection: WhatsApp Voice (phone call) and AnyDesk (remote desktop)
The Challenge:
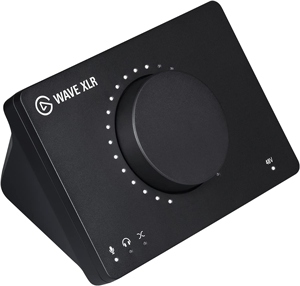
Our client, a gaming streamer with the username HeyThereDaliah on Twitch, was experiencing audio issues with her Elgato Wave Link audio interface. Her microphone was not being picked up by OBS for her stream, nor by her in-game chat (specifically within GTA V’s FiveM container). This significantly hindered her ability to create content and interact with her audience.
The primary hurdle was correctly configuring the audio routing options within the Elgato Wave Link software, which includes a virtual mixer and VST effects. Additionally, the client needed to ensure her earbuds, plugged into the Wave Link’s headphone jack, were functional as a Windows playback device, and that her microphone with effects was correctly routed to both OBS and her game.
The Solution:
After the client reached out, we arranged a remote support session for the next day. I connected with the client via a phone call and used AnyDesk for the remote desktop connection, allowing me to diagnose her audio configuration problems.
Enabling Headphone Output: My first step was to address the client’s inability to hear audio through her Wave Link headphones. I navigated to Windows Sound Settings, then to the advanced properties for the Elgato Wave Link device. I found that the headphone output was disabled as a playback device. Enabling this allowed it to be selected as the default sound option in Windows, and a quick test with a YouTube video confirmed audio was now playing through her earbuds.
OBS Microphone Input Configuration: With the headphone output resolved, we moved to OBS. I guided the client to select the “Wave Link Microphone with FX” as her primary audio input device for the stream.
OBS Audio Monitoring Setup: In OBS’s audio settings, we set the default audio output to the Elgato Wave Link headphone output. This allowed the client to monitor her microphone audio (with effects applied by Wave Link) directly through OBS, confirming the correct input.
In-Game Chat Integration (GTA V / FiveM): To ensure her microphone worked in-game:
We launched GTA V within the FiveM container.
We accessed the game’s voice chat settings.
I guided the client to select “Elgato Wave Link Microphone with FX” as the default input for voice chat.
The Elgato headphone output was selected as the output for in-game and voice chat audio.
A system restart was required for the game to fully recognize these audio changes.
Live Testing: After the restart, the client entered a game server and successfully tested her voice chat, confirming that other players could hear her clearly and with her desired microphone effects.
The Outcome:
The client was delighted with the session’s results. She now had fully functional audio running both in and out of her headphones, directly through her Elgato Wave Link device. Crucially, she gained a clear understanding of the complex audio routing within her setup, empowering her to manage and troubleshoot these options confidently in the future. Her ability to stream and engage in in-game chat was fully restored and optimised.
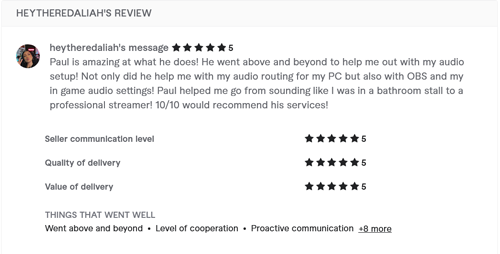
After the session, Daliah was kind enough to leave a 5-star review on my Fiverr profile:
Paul is amazing at what he does! He went above and beyond to help me out with my audio setup! Not only did he help me with my audio routing for my PC but also with OBS and my in game audio settings! Paul helped me go from sounding like I was in a bathroom stall to a professional streamer! 10/10 would recommend his services!
Key Takeaways:
Virtual Mixers & OS Settings: Complex audio interfaces like Elgato Wave Link integrate deeply with the operating system. Overlooked OS sound settings (e.g., disabled playback devices) can block crucial audio paths.
Layered Configuration: Achieving optimal audio for streaming and gaming requires configuring not just the streaming software (OBS) but also the interface’s proprietary software and the game’s internal audio settings.
Input/Output Precision: Carefully selecting the exact input/output devices (e.g., “microphone with effects“) is critical when using virtual mixers that offer multiple signal tap points.
System Restart for Games: Some games, especially those using external launchers or containers (like FiveM), require a full system restart to properly register changes made to audio input/output devices.
Expert Insight:
This case highlights a common challenge for streamers: bridging the gap between sophisticated audio hardware, virtual mixing software, and the varying audio demands of streaming platforms and games. It’s not just about selecting a microphone; it’s about understanding the entire signal chain—from the raw mic signal, through the virtual mixer’s effects, into the operating system’s audio pathways, and finally into the specific application (OBS or game).
The solution often involves methodically checking each link in that chain, from the lowest-level operating system settings to the application-specific inputs. Empowering the client with this understanding, rather than just providing a fix, ensures they can confidently manage their audio setup for future streaming sessions, which is a core part of comprehensive technical support.
Related Service
🎤👨🔧
Live Diagnostic Call
Remote screen-share session to diagnose and resolve audio problems
We listen, explain what’s wrong and show you how to fix it.
Summary: This case study details how Audio Support swiftly resolved a persistent live stream audio issue for YouTube content creator “Reel Time with Mark.” During a single remote support session lasting an hour, Audio Support Technician Paul Andrews optimized his microphone technique and built a professional audio processing chain in OBS, dramatically improving his sound quality and audience engagement.
Client’s Initial Request
Mark, a popular YouTube content creator known as “Reel Time with Mark” (R-E-E-L Time, as he plays slot games), reached out to Audio Support in late April 2025. He was experiencing significant issues with his live stream audio using OBS (Open Broadcaster Software). His audience had been complaining about poor volume and overall sound quality, impacting his viewer experience and engagement. He sought expert help to make his voice clear and consistently audible for his streams.
Arranging a Remote Support Session & Comprehensive Audio Optimization
Mark found my service and booked me for a remote support session later that week. At the time of our appointment, we connected our screens via AnyDesk while speaking via WhatsApp Voice Chat to ensure a smooth setup. To accurately monitor Mark’s audio, I installed the Audio Movers “ListenTo” plugindirectly within OBS, allowing me to hear exactly what his audience was hearing in real-time. This session was dedicated to a comprehensive optimization of Mark’s microphone setup and OBS audio processing.
Identifying the Problem: Unoptimised OBS Settings & A Need for Foundational Checks
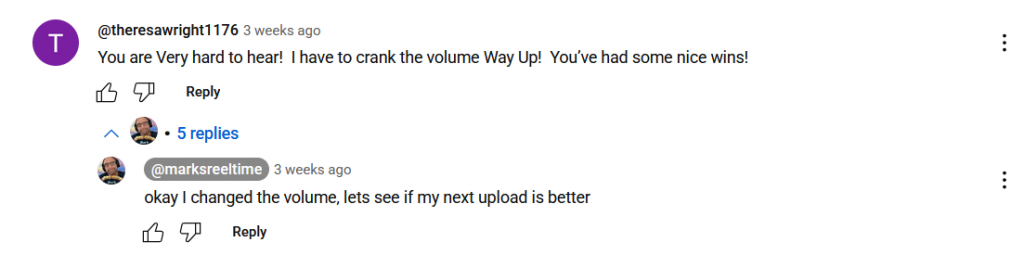
The client was experiencing inconsistent volume and poor clarity in his live stream audio on OBS. While the core issue stemmed from unoptimized audio processing within OBS, a critical first step in any professional audio diagnosis is to systematically validate the microphone’s physical setup and settings. This ensures that the audio entering the software is as clean and optimal as possible before any digital processing begins. Comments from his “before” videos frequently mentioned the audio issues, such as:
I guided Mark through a series of precise adjustments and implemented industry-standard audio processing directly into his OBS setup:
Systematic Microphone Setup Validation:
Positioning & Polar Pattern: I first ensured his microphone was correctly positioned, explaining how to best utilise its polar pattern for optimal sound capture and to minimize unwanted background noise. This step systematically confirmed that the microphone was being used to its fullest potential from the very source.
Distance & Microphone Settings: We meticulously checked the microphone’s distance from his mouth and verified that any built-in settings, such as pad or roll-off, were correctly configured for his voice and environment, confirming that the physical input was pristine.
OBS Audio Processing Chain: Taking control of his OBS setup, I systematically added and configured the following filters:
Noise Reduction: Applied a filter to effectively reduce unwanted background noise from his environment.
Compressor: Installed and fine-tuned a compressor to bring up his overall volume, ensuring consistency in his speech levels, making him clearly audible even when speaking softly.
Limiter: Added a limiter to act as a safeguard, preventing any sudden loud sounds or excited shouts from causing clipping and distortion, maintaining audio integrity at all times.
EQ (Equalization): Experimented with EQ settings but determined that his voice, once properly gained and compressed, sounded excellent without further tonal adjustments, keeping the processing clean and natural.
Audibility & Clarity Testing: We conducted extensive tests at various speaking volumes, from soft whispers to excited moments, ensuring his voice remained consistently clear, audible, and free from clipping. This provided Mark with the confidence to speak naturally during his streams.
Concluding the Remote Support Session
By the end of the session, Mark’s live stream audio was transformed. His voice was consistently clear, well-balanced, and professional-sounding, addressing all the volume and clarity issues his audience had reported. He was extremely happy with the immediate and dramatic improvement.
I made sure Mark understood how to add the Filters for himself should he need to reinstall or make changes to OBS in the future. OBS doesn’t allow users to save Filter presets so Mark and I saved screenshots of his settings.
Client’s Experience & Tangible Results
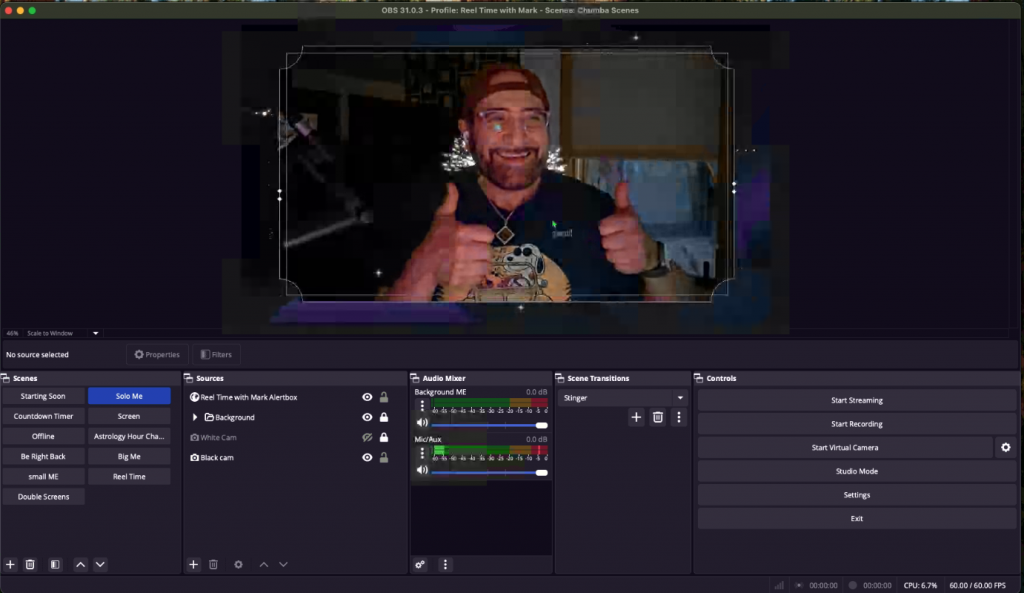
Mark was absolutely delighted with the outcome, allowing me to take this screenshot to use in this case study article:
The tangible results were immediate and dramatic, transforming his live stream audio. He later provided this glowing feedback:
“Paul is exactly what you are hoping you’ll get when you hire a service like his. My sound was getting complaints from my YouTube followers. I listened to countless voices online telling me what to do with my settings and none of them worked. Paul set a date and time with me and called at the exact minute of the appointment. He made a copy of my sound settings and had me recreate what I do online, and when he was done, I sounded amazing (or as amazing as a nonprofessional can sound). Did I mention he is easy to talk to, friendly, smart, and takes what he does seriously? If you have any issues with your sound or if you are wondering if your sound could be improved… ‘Better Call Paul’ (sorry, I couldn’t resist).”
Even more powerfully, in his very first stream after our session, Mark immediately addressed his audience about the improved sound, stating:
“Good morning everybody… I have new sound, I hope it sounds okay… I think it does though. He was amazing, he was really amazing. And friendly… If you need help with your sound and if you think this sounds good, let me know.”
You can hear the difference for yourself:
This provides compelling, real-world evidence of the transformative value of professional audio optimization for content creators.
Expert Insight
For live streamers and content creators, crystal-clear audio isn’t just a luxury – it’s fundamental to audience engagement and professionalism. Viewers will often tolerate imperfect video, but poor audio is a deal-breaker. Optimising microphone technique and building an effective audio processing chain in OBS can dramatically elevate a stream’s quality, turning casual viewers into loyal subscribers.
Related Service
🎤👨🔧🎛️🎚️
Pro Audio Setup
We take care of everything for you.
Full remote setup and configuration of your single-mic studio.